It can sometimes be a nightmare to get accurate Google Analytics 4 data. Especially if you are either a large company with lots of employees working on your website or a small company just starting to generate traffic. One of the metrics that skews your data the most is improperly filtered internal traffic. This type of traffic will often be registered as more engaged, more recurring, and with a longer view time than an average user. As developers, testers, admins, etc. are expected to engage a lot on your website while developing and testing various aspects. Below is a short list of risks or symptoms, you can face when you do not filter internal traffic.
- Inaccurate engagement measurement
- Incorrect conversion tracking
- Inaccurate sales funnel analysis
- Incorrect improvement area identification
- Ineffective A/B testing
- Etc.
In this article, we will go over the three best methods to exclude internal traffic in Google Analytics 4. Applying these will greatly improve your Analytics 4 reporting data.
Exclude internal traffic with Google Tag Manager
In this article, we will assume you are familiar with Google Tag Manager (GTM) and are using it to implement Google Analytics 4 (GA4) on your website. If you are not using GTM, only the first part of this article will apply to you. Regardless, you could still learn the strategies in this article and use them to filter traffic by diving into the source code. Aside from this I highly suggest you implement Analytics using GTM on your website as it provides numerous benefits, but that’s another article for another time!
Before we get started – If you are not tech-savvy and would like someone to clean up your analytics data and build some top-notch reports, get in touch! We offer a variety of services, schedule an introductory call for free.
1. How to filter traffic from internal IP addresses
The first and easiest part of cleaning up your analytics data is filtering out your internal IP addresses. This is probably the least technical and most impactful filter everyone should apply. Whether you have a company with many employees or are a freelancer sitting at home, you likely don’t want Analytics to take traffic into account that originates from within your business’ network.
Step 1. Define your internal IP addresses
Firstly, you should know your IP address or the range of IP addresses that are considered “internal”.
If you only have one IP, I recommend searching on Google “what is my IP” to determine which IP address you have. Please take into account any VPN or proxy services that might be running, which can affect your IP.
If you are part of a larger organization with multiple IP addresses, ranges, or VPNs, I recommend you to check in with the IT department of your company.
When you determined your IP address, you are ready to configure this in Google Analytics, so let’s start there. In your Analytics dashboard, open the desired property and click on “Data Streams”. Open the relevant data stream.

Next, find “More Tagging Settings” and click on “Define internal traffic”. Create a new entry.
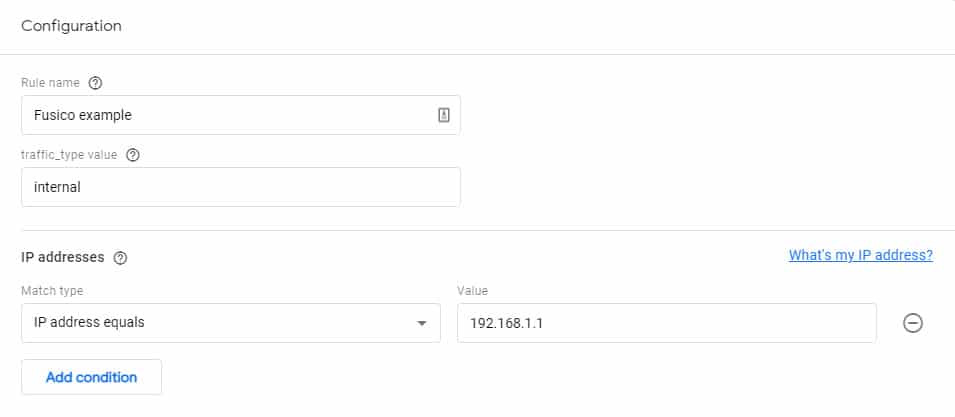
Define the IP address or addresses you wish to consider “internal”. The IPs you define here will eventually be filtered out and not considered website traffic by Google Analytics. You can add multiple lines, ranges, etc. depending on your situation.
Make sure to click create. After your internal traffic is defined, you are ready to go to the next step.
Step 2. Test your internal IP filter
Now your internal traffic is defined, we need to filter it out. To do so, go to your property and locate “Data Settings”. In there, click on “Data Filters”.

By default, you should already have a filter called “Internal Traffic” in the Testing state. If this is not the case, create a new filter exactly like the below screenshot.
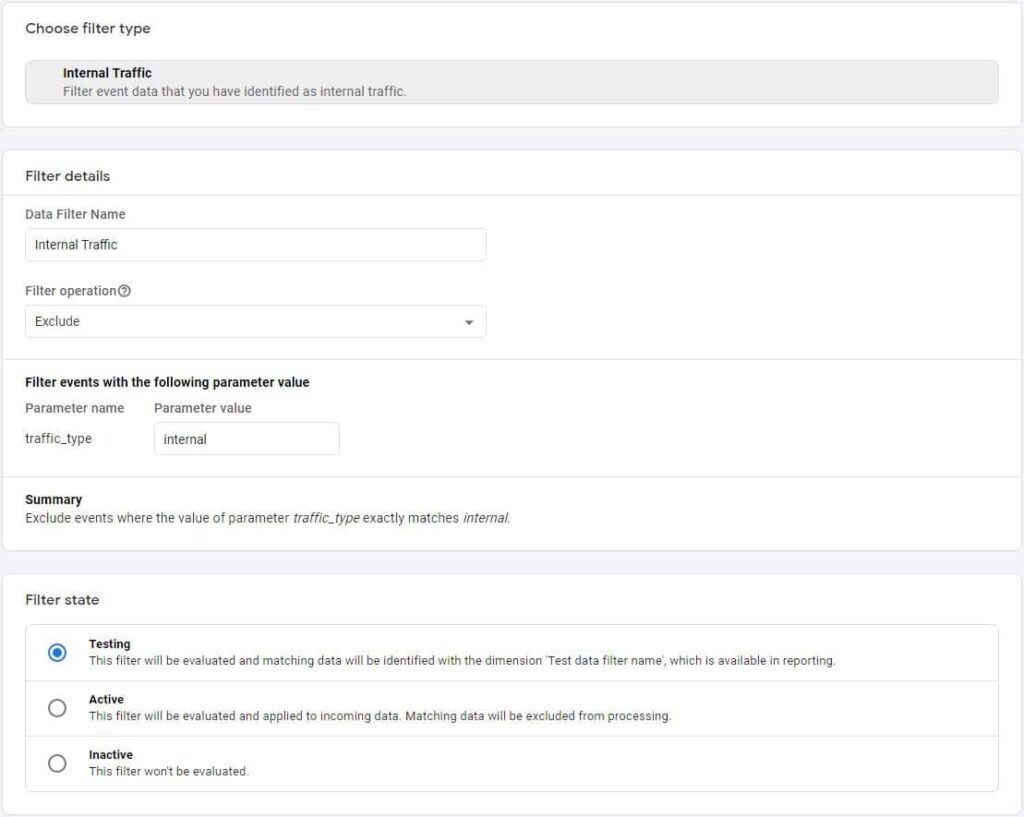
That’s it! you can now start testing your filter. We won’t cover filter testing in this article, but it is as easy as sending some internal traffic to GA4, adding a comparison, and exclude the internal traffic filter. If you see the internal traffic is filtered out in this new comparison, you are good to go!
Step 3. Apply your filter
The final step is to apply filter and enjoy much cleaner Google Analytics data! Next, we will see how we can clean up our data even better, but you will need Google Tag Manager to make it happen.
2. How to prevent filters from blocking debug mode in Google Analytics
By default, filtering out your internal IP addresses as you did in step 1 will no longer allow you to view any session info in the “DebugView” on Google Analytics. This can be highly valuable to quickly test some events even though the DebugView in itself can be quite buggy. I know, it is quite ironic!
Step 1. Create a developer filter in GA4
Like in the first part, go to your property and locate “Data Settings”. In there, click on “Data Filters”. and create a new developer traffic filter according to the specs in the screenshot below.
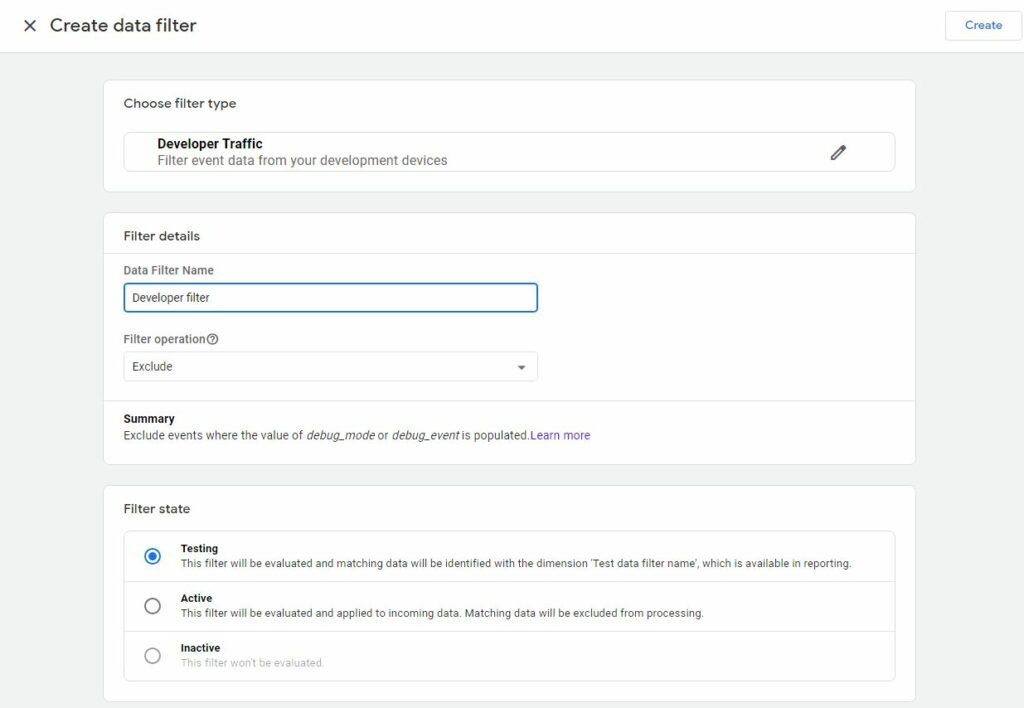
Now just click on “Create”. Next, we will be creating a way to allow “DebugView” even when you are on an internal IP.
Step 2. Create a lookup table to send the correct traffic type to Google Analytics
The strategy here is to send the traffic_type variable to Google Analytics and populate it with either a blank value (if we are not actively debugging) or populate it with any other value than “internal”. “developer” is the value we will use in this tutorial. The result is: when we are using the debug mode in Google Tag Manager, we will still be able to see our session in Google Analytics’ DebugView. Regardless if we are on internally defined IP addresses or not.
Let’s first create a new variable that will be used to keep traffic_type when we are not using developer mode, by making a variable that populates with {{undefined}}.

Next, we need to create our lookup table variable which will be our decision block on which value to send to our traffic_type variable. It is important to use our {{Undefined}} variable, as this is not the same as just leaving this state blank.
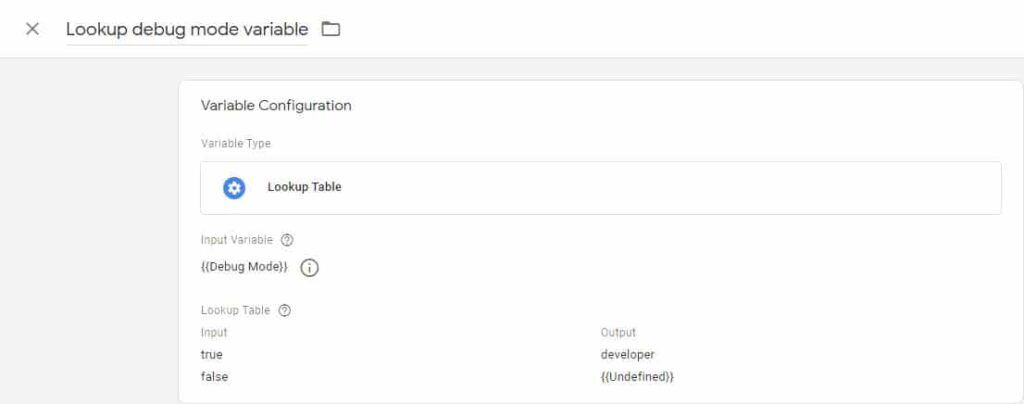
Now we created the lookup table variable, we just need to use it as the value for our traffic_type parameter on the configuration tag of your Google Analytics 4 in Google Tag Manager. Set it to reflect the below screenshot.
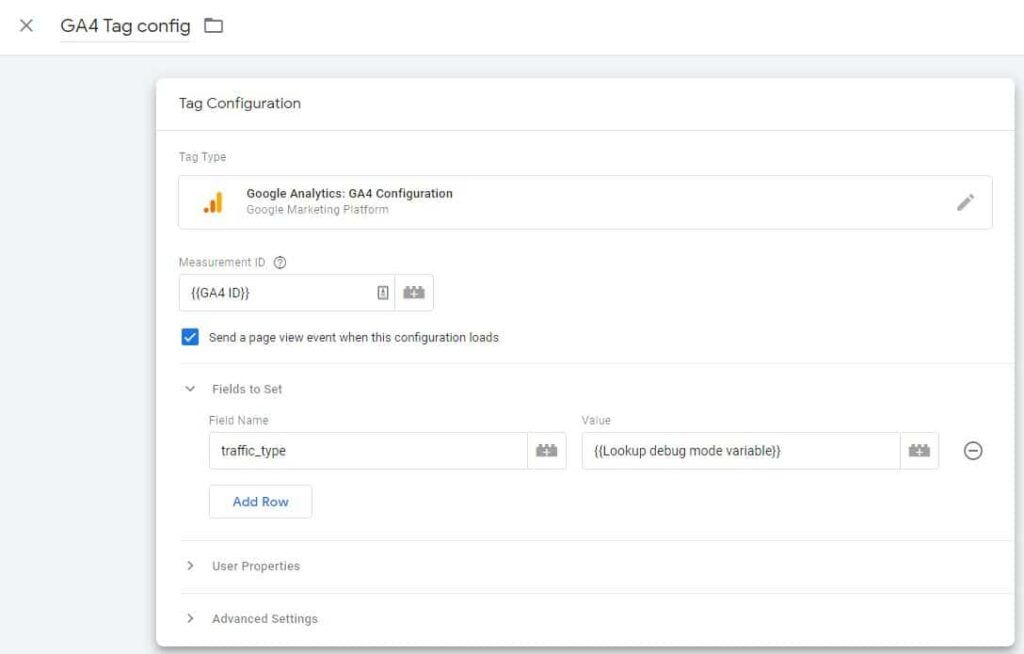
The result is Google Analytics 4 will no longer see your developer mode traffic as internal (eg. when using GTM’s Preview Mode).
Step 3. Test debug mode and apply your filters
We won’t spend much time on testing here as we will quickly bypass this step partially by continuing onto the final step. If you want to make sure everything works as expected, you can do the following: if you are on an internal IP and you are using GTM in Preview mode, you should still be able to use GA’s debug view, and events should be coming through.
All works? Let’s continue to the last step: and probably the most interesting step for when your employees can access your website out and about.
3. How to filter traffic from specific logged-in users (eg. administrators)
This final step is sometimes as important if not more important than the first part. A combination of both is extremely powerful. How relevant this step is for you all depends on how you work. Do you check the website on mobile when you are out and about? Do you have an IP address that changes often? Are your employees working remotely? If the answer is yes, this final part is handy if not crucial for you!
Unfortunately, we currently don’t have very advanced filtering in Google Analytics 4 just yet. Until we do, the method I describe below will be the best way to exclude logged-in users from your Google Analytics 4 data. For this part you will also need Google Tag Manager, there is no way around it unless you want to go into some rather complex coding on your website by yourself. Whether you are ready to get your hands dirty or not, keep reading along as we will explain the strategy behind our GTM setup.
Step 1. Use an identifier for your logged-in users
In this tutorial, we are using an amazing plugin for implementing Google Tag Manager on your website. It is called Google Tag Manager for WordPress by Thomas Geiger. This will allow us to quickly and easily implement an identifier in the Data Layer. If you are not using this plugin, you will have to find another way to push an identifier into your Data Layer when a user (or only certain users) are logged in. The strategy we follow is, if we detect someone accesses the website in an administrator role, we will exclude the data from Google Analytics. This means you are no longer just limited to internally defined IP traffic.
The only caveat – if you are an administrator but not logged into the website on the device you are browsing, your data will still be transmitted to Google Analytics if you are not on the internal network. The key here is to make employees aware and ask them to log into your website before visiting.
Below you can see the configuration we set in the Google Tag Manager for WordPress plugin to identify our users.
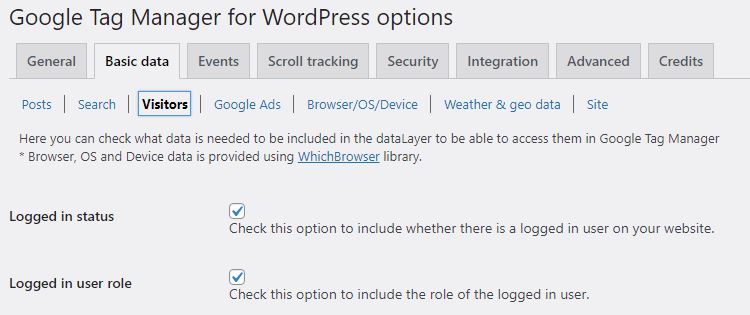
Our Data Layer will now contain the logged-in status (not used in this tutorial) and the user role if the user is logged in. We used this last identifier to see if an “administrator” user is logged in.
You can easily verify what user role GTM4WP is sending by using the Preview mode in GTM and clicking on the Data Layer tab. “administrator” in our case.

Step 2. Create two additional lookup tables in GTM to send the traffic type to Google Analytics
Now we know our identifier, it is time to create 2 additional lookup table variables. We don’t want to lose the work we did in the second part of this tutorial, so we will need the following:
- A lookup table to identify debug traffic (done in part 2)
- A lookup table to identify administrators
- A lookup table to conditionally allow debug traffic regardless of the user and if no debug mode is active, to check if an administrator is logged in.
Create the final two lookup tables according to the below two screenshots.
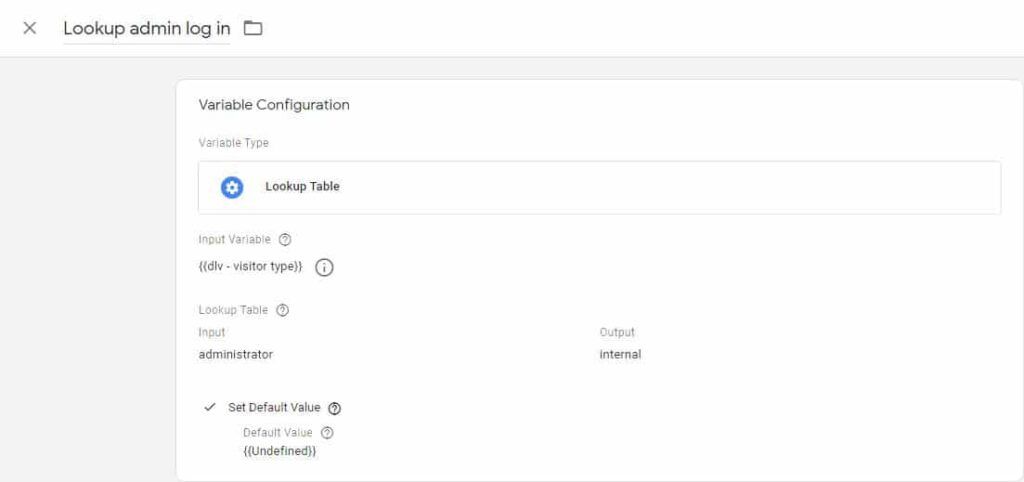
Afterward, create the final lookup table variable.
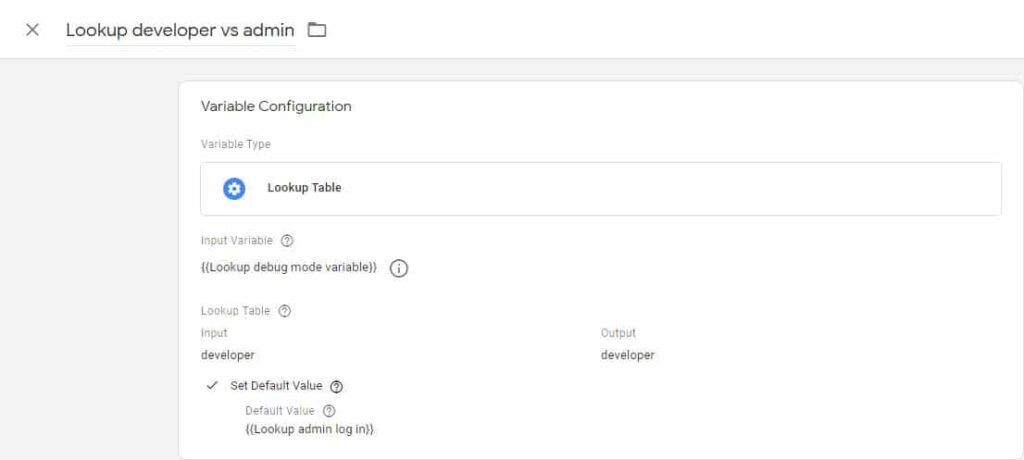
The final setup remaining, is to change how we identify the traffic_type on the GA4 configuration tag. Go back into your configuration tag and change traffic_type to reflect the new lookup table variable.
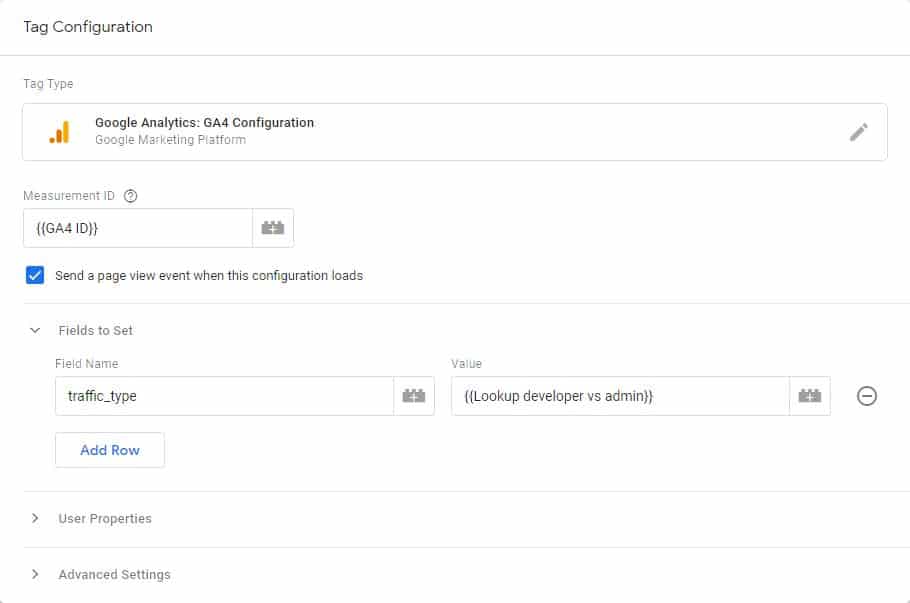
That should be it! If you have paid close attention (especially to the spelling of your user role name, capitalization is important!) you should be set.
Step 3. Test in debug mode to make sure traffic is correctly identified
Just to make sure all setup is correct, we should run some tests. If you are using Chrome, you can best use the Google Analytics Debugger tool to push all your test data into the Debug View. Alternatively, you can use your browser’s built-in network inspection tool. ctrl+shift+i in Chrome, Firefox, or Edge then browse to “Network”.
Reload your website and filter for “analytics.google”. You should see an entry that should list the traffic type under the header tab as “tt” (see below)
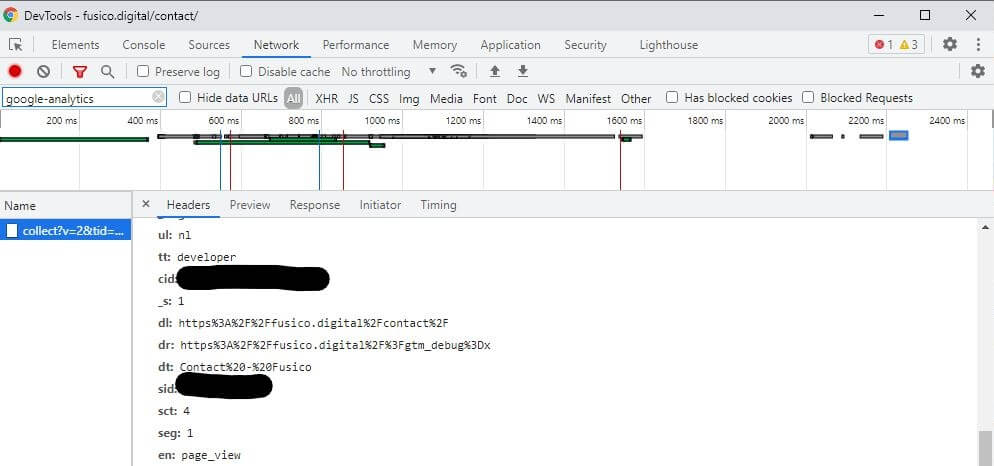
If your tests conclude with the same traffic types as expected (see below list) you are ready to publish your new GTM container!
- Internal IP, logged out, not using GTM Preview mode: showing as internal traffic
- Internal IP, logged out, using GTM Preview mode: showing as developer traffic
- Internal IP, logged in, not using GTM Preview mode: showing as internal traffic
- Internal IP, logged in, using GTM Preview mode: showing as developer traffic
- External IP, logged out, not using GTM Preview mode: traffic type is not set, and thus not filtered
- External IP, logged out, using GTM Preview mode: showing as developer traffic
- External IP, logged in, not using GTM Preview mode: showing as internal traffic
- External IP, logged in, using GTM Preview mode: showing as developer traffic
4. Conclusion
That’s it! You are now set with a clean sheet to start collecting Google Analytics data. It might seem complex, but I assure you the hassle is worth the effort. Below a summary of the benefits.
- Accurate engagement measurement
- Correct conversion tracking
- Accurate sales funnel analysis
- Precise improvement area identification
- Effective A/B testing
- Etc.
In a nutshell, all important data is much more accurate, and you are set to grow your business!
Do you like what you just read? Maybe this blog did not exactly apply to your issue and you need help from us? Get in touch and we are more than happy to see how to get you moving forward!
